|
USER GUIDE - USER GUIDE - USER GUIDE - USER GUIDE
AntiSniff
AntiSniff is a Graphical User Interface (GUI) driven tool for detecting promiscuous Network Interface Cards (NICs) on your local network segment. AntiSniff was designed to be run in two ways. First, for a "spot check" to quickly identify wh
at machines on a local network segment are most worthy of further investigation. Second, AntiSniff may be run on a continual basis, scanning the network at scheduled intervals, comparing host test responses over time and setting off alarms based on user-
defined events surrounding those test responses.
AntiSniff is an Microsoft Windows based product that will run on Windows 95/98 and NT. While AntiSniff may run on Windows 95/98, Windows NT is the recommended platform. Please refer to the FAQ for the latest recommendations on what platforms are supp
orted. The user is presented with a series of 5 tabs through which they progress (from left to right) in using the product. The user invokes the application, sets up network parameters, sets up scan test parameters, executes the scan, generates reports
and sets alarm thresholds. By following this series of steps, the user can be alerted to machines which are found in promiscuous mode by reviewing reports or being notified with local alarms, email and subsequently text pagers (that have an email address
).
Start/Invoke
To start AntiSniff, go to the Start menu, Program Files, and single click on the AntiSniff icon. AntiSniff will be launched and a splash screen will announce its invocation.
AntiSniff will by default, initialize with an "UNTITLED" AntiSniff Session (.ass) file which will load a default set of configuration values. AntiSniff may be initialized with configuration information and data provided by an .ass file passe
d to AntiSniff as a parameter during startup. AntiSniff Sessions may also be loaded through the "Open Session" menu item off "File" on the main menu.
Configure Network Tab
There are two network components to configure. The first is host related and is used for specifying a machine or range of machines to run the tests against. The second component is related to your machine’s network interface.
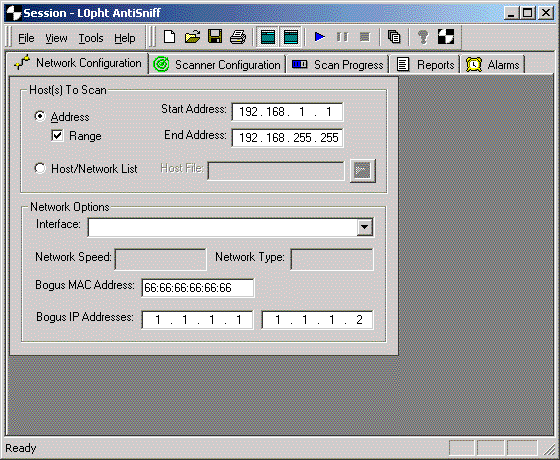
Host(s) to Scan Pane
Address radio button – Use this radio button to indicate that an address or address range is used to indicate target machine(s) instead of a Host/Network list.
Start Address field – Populate this field to scan a single machine. For a range of machines, fill in the first machine's IP address in that range.
Range checkbox – Use this checkbox to scan multiple machines if specifying a 'range' of IP addresses rather than specifying hosts from a Host/Network list (file).
End Address field - When scanning a range of machines, fill in the "End Address" field (this value works in conjunction with the 'range' checkbox.
Host/Network List radio button - Use this button to specify machines to be scanned from a file of hostnames or IP addresses.
Host/Network List text box - Use this box to specify what file to use for specifying machines. This box will automatically be populated if you use the "browse" button located to the right of the text box to select a file. Host/Network List
files are formatted as a single column of hostnames, ip addresses or address ranges formated as from:to. These values may be mixed within a single file such that the following example entries are all valid:
172.19.1.1
contractor1
miscreant.my.net
ntgateway.my.net
172.16.0.0:172.16.255.254
Network Options Pane
Interface picklist - This picklist is used to specify which network interface to use. The picklist is derived from all network interfaces on the scanning machine as configured in the control panel.
Network Speed text display - This value is automatically derived from the selected network interface and indicates the network interface speed.
Network Type text display - This value is automatically derived from the selected network interface and indicates the type of network interface.
Bogus MAC Address text box - This field is used to specify what MAC (Medium Access Control) address to use when performing tests which flood the target host(s) with traffic they should not see unless they are sniffing. The suggested value for
this field is 66:66:66:66:66:66 as this does not map to any current vendor code and is not a multicast or broadcast address (the second hex digit, reading from the left, is even). Please note that using broadcast or multicast addresses might present unw
anted effects.
Bogus IP Addresses text boxes - There are two fields to fill in bogus IP addresses to be used in the tests. These IP addresses should be two different IP addresses that would not be seen on the network segment AntiSniff is running on. These
IP addresses are used as bogus source (src) and destination (dst) addresses for certain tests. For more information on how these are used by the tests, see the <a href="http://www.l0pht.com/antisniff/tech-paper.html">AntiSniff Technical O
verview</a>. The recommended values for these text boxes are 1.1.1.1 and 1.1.1.2.
Configure Scan (Tests) Tab
There are currently 6 tests which may be configured to run or not run. Some of these tests also include additional parameters specific to the given test (for instance, the number of packets to use for the test). Some tests produce data points (respon
se times) over a period of time which are analyzed for deltas whereas other tests simply generate TRUE/FALSE output data points. This tab is also used to configure other attributes of the scan including logging of output, scheduling and data point retent
ion.
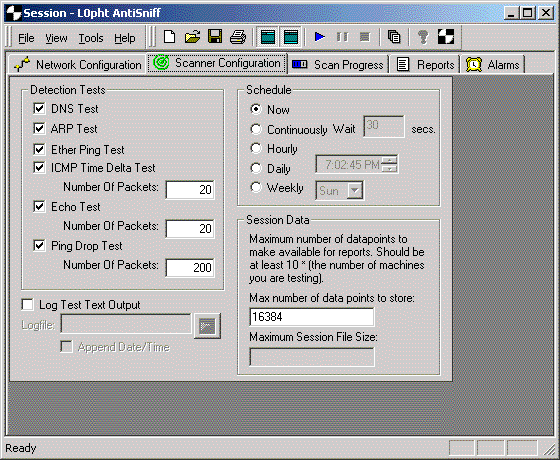
Detection Tests pane
DNS Test checkbox - Check this box to include the DNS test in the scan. For further details on the DNS test itself, see the DNS Tests section of the <a href="http://www.l0pht.com/antisniff/tech-paper.html">AntiSniff Technical
Overview</a>.
ARP Test checkbox - Check this box to include the Address Resolution Protocol (ARP) test in the scan. For further details on the ARP test itself, see the Windows 95,98,NT Host Specific section of the <a href="http://www.l0pht.com/anti
sniff/tech-paper.html">AntiSniff Technical Overview</a>.
Ether Ping Test checkbox - Check this box to include the Ether Ping test in the scan. For further details on the Ether Ping test itself, see the Linux and NetBSD Host Specific section of the <a href="http://www.l0pht.com/antisniff/tec
h-paper.html">AntiSniff Technical Overview</a>.
ICMP Time Delta Test checkbox - Check this box to include the ICMP Time Delta test in the scan. All four phases of the ICMP Time Delta test are enabled through this checkbox and are not independently configurable. For further details on the
ICMP Time Delta test itself, see the Network and Machine Latency Tests section of the <a href="http://www.l0pht.com/antisniff/tech-paper.html">AntiSniff Technical Overview</a>.
Number of Packets text box - Use this box to indicate the number of packets to be used in the ICMP Time Delta Test. The suggested value is 20 packets based on the assumption that the goal is to scan a class C network in a reasonable (not ove
rnight) amount of time. Increasing this value will increase the accuracy of the test at the expense of time to run the test. Decreasing this value will shorten the scan time for the test at the expense of accuracy.
Echo Test checkbox - Check this box to include the Echo test in the scan. All four phases of the Echo test are enabled through this checkbox and are not independently configurable. The Echo test is only relevant for hosts running the Echo se
rvice. For further details on the Echo test itself, see the Network and Machine Latency Tests section of the <a href="http://www.l0pht.com/antisniff/tech-paper.html">AntiSniff Technical Overview</a>.
Number of Packets text box - Use this box to indicate the number of packets to be used in the Echo Test. The suggested value is 20 packets based on the assumption that the goal is to scan a class C network in a reasonable (not overnight) amo
unt of time. Increasing this value will increase the accuracy of the test at the expense of the time to run the test. Decreasing this value will shorten the scan time for the test at the expense of accuracy.
Ping Drop Test checkbox - Check this box to include the Ping Drop test in the scan. Both phases of the Ping Drop test are enabled through this checkbox and are not independently configurable. For further details on the Ping Drop test itself,
see the Network and Machine Latency Tests section of the <a href="http://www.l0pht.com/antisniff/tech-paper.html">AntiSniff Technical Overview</a>.
Number of Packets text box - Use this box to indicate the number of packets to be used in the Ping Drop Test. The suggested value is 200 packets based on the assumption that the goal is to scan a class C network in a reasonable (not overnigh
t) amount of time. Increasing this value will increase the accuracy of the test at the expense of the time to run the test. Decreasing this value will shorten the scan time for the test at the expense of accuracy.
Log Test Text Output
Log Test Text Output checkbox - Use this box to log output from the "Scan Progress" scrolling text window to a file.
Logfile text box - Use this box to specify what file to use for logging output from the test output. This box will be automatically populated if you use the file browser button located to the right of the text box.
Schedule pane
The AntiSniff session's Schedule does not interface with any job scheduling software. It is simply a schedule on which a scan will initiate the enabled tests to capture new data points. Thus, not only must AntiSniff be running but a scan must be st
arted to observe this schedule.
Schedule radio buttons - Select one button to select a schedule:
- Now radio button - Will run now, once.
- Continuously radio button - Will run continuously.
- Wait text box - Use this box to indicate the number of seconds to wait between scans.
- Hourly radio button - Will run every hour, on the hour.
- Daily radio button - Will run every day at the time specified.
- Time control - Use this control to indicate the time of day to run daily or weekly.
- Weekly radio button - Will run every week at the day and time specified.
- Date control - Use this control in conjunction with the time control above to pick the day (and time) to run weekly.
Session Data pane
Many of AntiSniff’s capabilities to detect NICs in promiscuous mode depend on long term trending of data points and variances from standard deviations. For this reason, AntiSniff stores data for a given "session" right along with the configu
ration information in AntiSniff Session files (.ass files). Storage of data points may cause AntiSniff Session files to grow considerably. For this reason, AntiSniff gives you the ability to manage the number of data points retained for analysis. As th
e threshold is reached, the oldest data points for the given AntiSniff Session are thrown away. Maximum Number of Data points text box - Use this box to indicate the maximum number of data points that will be stored for reporting purposes. This n
umber should be at least 10 times the number of machines you will be scanning.
Starting a Scan
Once network and scan configurations have been selected, scans may be initiated by selecting "Tools" off the main menu, then selecting "Start Scan". The scan may also be initiated from the Toolbar by pressing the blue "play" button.
Running the scan will bring you to the "Scan Progress" tab.
Monitoring Scan Progress
Scan progress may be monitored on the "Scan Progress" tab. The machine being scanned is identified at the top of the tab as "Currently Testing:". Text messages are displayed below this, indicating what tests are run, what phase of the test they are
performing, the machine being tested, the test validity and other test-specific data such as packets sent, packets received, average response time (in ms), machine reported, promiscuous count, etc... This output is also logged to a file depending on the
"Log to file" setting on the "Configure Scan" tab.
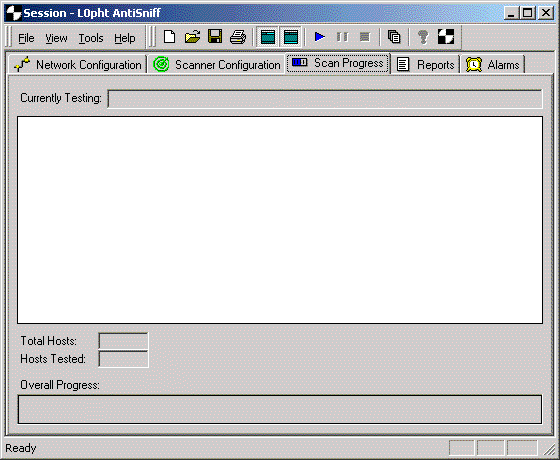
Along the bottom of the screen, additional information is displayed including "Total Hosts" and "Hosts Tested" as well as a "Overall Progress" bar. Progress is updated per machine.
Generating Reports
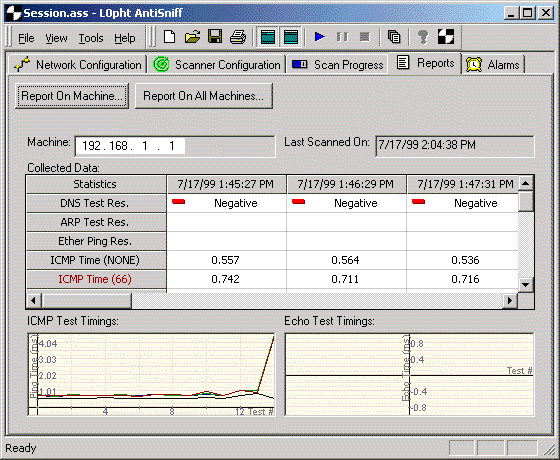
Once at least one testing session has been fully run (one set of data points collected), the "Report Generation" tab may be used to view more meaningful results on a machine by machine basis. The "Report Generation" tab is divided into three panes: u
pper pane for tabular data, lower left pane for a histogram of ICMP test results and lower right pane for a histogram of "Echo" test results.
<
 Click on image to zoom
Along the top of the tab, as well as in the toolbar is a button to generate a machine specific report. Under the "Report on Machine" button two text boxes display the machine and its last scan date and time. Until a machine has been specified, these
boxes as well as the tabular data and graphs below will remain blank.
Pressing the "Report on Machine" button will open a dialog box presenting the user with a list of machines included in the session's configuration along with the number of data points collected for that machine. Data points are tied to a specific ses
sion configuration and are included along with scan configuration information in AntiSniff's .ass files. Future versions of AntiSniff will support export of these data points for use in other tools such as spreadsheets.
The user must select a machine from the list of machines. Once a machine has been selected, the user must press OK and is returned to the "Report on Machine" tab. All tabular data and graphs will be populated based on that machine's data points.
Tabular data is displayed with test names and phases along the left-hand axis and time/date associated data along the bottom axis. The first three tests (DNS Test Res., ARP Test Res., and Ether Ping Res. are represented by positive/negative values wh
ereas all other tests represent response times in ms, packets dropped/sent, or other test specific values. These statuses may be tied into settings on the "Alarms" tab to trigger alarms on values either showing up as positive or changing, as appropriate
for the given test. A positive may not necessarily mean that a sniffer has been found. Viewing the options on the "Alarms" tab should reveal when a positive indicates a sniffer or doesn't indicate a sniffer using this logic.
The ICMP Test Timings graph is used to plot the various phases of the ICMP Time Delta Test against each other. The user is presented with 4 lines displaying ICMP responses from the target machine with no flooding, "66" packet flooding, TCP SYN floodi
ng and TCP flooding with full three way handshaking. Large variances between lines could indicate a network interface in promiscuous mode or a machine with a network problem. For more information on the ICMP test itself, see the "Overview" section of th
is User Guide.
The Echo Test Timings graph is used to plot the various phases of the Echo Test against each other. Please note that the target machine must be running the UDP ECHO service in order for this test to be meaningful. If applicable, the user is presented
with 4 lines displaying echo responses from the target machine with no flooding, "66" packet flooding, TCP SYN flooding and TCP flooding with full three way handshaking. Large variances between lines could indicate a network interface in promiscuous mod
e or a machine with a network problem. For more information on the Echo test itself, see the "Overview" section of this User Guide.
Please note that with graphs, at least two sets of data points need to be generated for any data to show up. This means that at least two iterations of scans for the given session settings must be run to generate lines on the graphs. As time passes,
older data points are thrown out as configured by the user in the "Scan Configuration" tab, "Session Data" pane, "Maximum Number of Data points" text box.
Defining Alarms
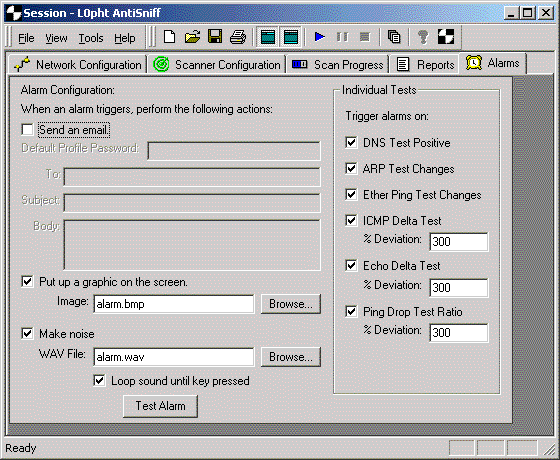
The use of alarms is a key feature in AntiSniff. Users may receive notice of promiscuous machines through local alarms, email and subsequently, email enabled pagers. To define alarms, go to the "Alarms" tab.
Alarm Configuration
Send an email checkbox - Use this box to send email messages when alarm thresholds (defined on the right - "Individual Tests" pane) are reached.
Default Profile Password text box -
To text box - email address for message recipient
Subject text box - email subject line for message.
Body text box - email message content.
Put up a graphic on the screen checkbox - Check this box to display a graphic on the screen when alarm thresholds are exceeded.
Image text box - Use this box to specify what file to use for alarm displays. A sample file (alarm.bmp) is available with the distribution. This box will automatically be populated if you use the "browse" button located to the right of the tex
t box. Only BMP (bitmap) files are supported.
Make noise checkbox - Check this box to sound an alarm when thresholds are exceeded.
WAV File text box - Use this box to specify what WAV file to use for alarm sirens. A sample file (alarm.wav) is available with the distribution. This box will automatically be populated if you use the "browse" button located to the right of th
e text box. Only WAV files are supported.
Loop sound until key pressed checkbox - Use this box to cause the WAV file to continuously repeat until a key is pressed.
Test Alarm button - Use this button to test the "Put up a graphic on the screen" selection and/or "Make noise" WAV File selection.
Individual Tests pane -
DNS Test Positive checkbox - Check this box to alarm on machines testing positive for the DNS test.
ARP Test Changes checkbox - Check this box to alarm on machines who's ARP test values change.
Ether Ping Test Changes checkbox - Check this box to alarm on machines who's Ether Ping test values change.
ICMP Delta Test checkbox - Check this box to alarm when a machine's ICMP deltas exceed the number of std. deviations indicated below.
% Deviation text box - Use this box to indicate the minimum number of std. deviations which will trigger an alarm on the ICMP Delta test. The recommended value is 300. See the AntiSniff FAQ (http://www.l0pht.com/antisniff/faq.html) for the mos
t up to date recommended values.
Echo Delta Test checkbox - Check this box to alarm when a machine's Echo deltas exceed the number of std. deviations indicated below.
% Deviation text box - Use this box to indicate the minimum number of std. deviations which will trigger an alarm on the Echo Delta test. The recommended value is 300. See the AntiSniff FAQ (http://www.l0pht.com/antisniff/faq.html) for the mos
t up to date recommended values.
Ping Drop Test Ratio checkbox - Check this box to alarm when a machine's Ping Drop Ratio exceeds the number of std. deviations indicated below.
% Deviation text box - Use this box to indicate the minimum number of std. deviations which will trigger an alarm on the Ping Drop test. The recommended value is 300. See the AntiSniff FAQ (http://www.l0pht.com/antisniff/faq.html) for the most
up to date recommended values.
Saving Anti-Sniff Sessions
AntiSniff session configuration and data are stored in AntiSniff's .ass format. To save the current session configuration and data, select "Save Session" from the "File" menu choice off the main menu or use the "Save Session" (floppy disk icon) butto
n on the tool bar.
Loading Anti-Sniff Sessions
To load AntiSniff session configuration information and data, select "Open Session" from the "File" menu choice off the main menu or use the "Open Session..." (open folder icon) button on the toolbar. The standard Windows "File Open" dialog box will
open permitting you to select a saved AntiSniff session (.ass file).
References
A number of references are available for further information.
For technical details on AntiSniff tests, check out Dr.
Mudge'’ technical description
http://www.l0pht.com/antisniff/tech-paper.html
For more information on Ethernet/MAC addresses, check out
http://netman.cit.buffalo.edu/FAQs/ethernet.faq U. Buffalo’s Ethernet FA
Of particular interest will be
http://ds.internic.net/rfc/rfc1700.txt IEEE 802 Numbers of Interest.
For even more information on Ethernet/MAC addresses, check out
http://wwwhost.ots.utexas.edu/ethernet/enet-numbers/README.txt U. Texas guid
e to troubleshooting Ethernet numbers. The README explains how to associate vendors with Ethernet address numbers.
For more information on IP addresses, check out
http://www.cis.ohio-state.edu/htbin/rfc/rfc1466.html Guidelines for Management of IP A
ddress Space RFC 1466.
| 