boomerangs
I have built my first boomerang when I was eleven. At that age, I was in a
summer camp and build three different boomerangs and learned how to throw
them. Somehow I lost two of those and forgot about boomerangs all. But this
summer I thought it is a nice idea to again build some and enjoy the sun while
throwing them. It is not at all difficult to throw them, but it requires some
sort of sensitivity and experience. There are the weirdest kinds of
boomerangs, and they are used for hunting, recreational or sport activities
all over the world.
I have had a couple of cheap boomerangs made out of plastic, which just are
not the same as throwing a selfmade boom for the first time. They do not fly
that well, and it does not hurt if you break one. A selfmade boom is something
unique, something you see spinning in the sky and know you did a good job at
creating the boomerang. It is something you can express yourself with.
It roughly requires three to four hours per piece to build a boomerang, the
way I build them. I first select plywood of the desired thickness (3 to 12
millimeters). As a rule of thumb, the thicker, the slower and farther the
boomerang will fly, the thinner, the faster and smaller-circled it will fly.
Most people use 5mm finish plywood for the average sport boom. I used normal
plywood in the past, which has only half as much plates, and is a bit heavier
and unstabler. It has worked fine for me though. After cutting the basic
boomerang shape, I rasp away the wing structure on the side of the boomerang.
It should be well balanced and well rasped, cheating or short-cutting at
rasping will not gain you anything. After rasping and fine cutting the wing
structure one can test the boomerang and make small modifications. Now only
the wood grounding and painting has to be applied, which should be weather
proof durable painting in bright colours. It is no fun to search for a dark
boomerang in high grass for an hour that is ;-)
I am for sure no expert at boomerang making and throwing, I just do it for
fun, so here are some of my boomerangs:
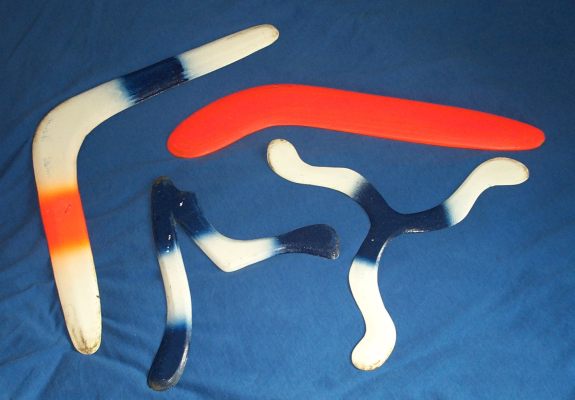
four selfmade boomerangs/throwstick
The boomerang on the left might be what you typically think of as a
'boomerang'. It is shaped with a 90 degree angle and flies a long stable slow
circle. The original aboriginal boomerang that looks similar to this was not
used for hunting, though. It had a slightly larger angle, too.
The orange throwstick at the top is a miniature of a hunting throwstick
used in Australia. It flies straight at the same altitude, spinning fast. It
is hard to see when flying because its entirely 'flat' in the air. That is the
reason why it is suited for hunting, it is not clearly visible to animals and
the spinning movement is intended to break the legs of the target on impact.
Among the boomerangs shown in the picture, it is the most difficult to throw,
and besides technique, it needs raw muscle power.
The boomerang in the lower middle is a long range sports boom with a
unique design. The first boomerang I made when I was eleven was of this shape,
so I made it just for fun again, although it does not fly that well.
In the right you see my favorite boomerang (now broken). It is made of
very thin 3mm plywood and has very sharp fins. I cut myself more than once
accidently when throwing it. It flies in small circles with a diameter of
about 20 meters in a very fast and stunning movement :). It is the easiest to
throw boomerang I have built so far, and does not require strength at all.
From the boomerangs above, its the only one designed entirely by myself. The
design is a bit weak, I will have to improve it a bit in stability, since a
friend of mine broke it accidently when throwing it (hi acpizer ;-).
If you want to start to build your own boomerangs (which is easy), you might
find the following information useful:
And as always, do not forget that it is about having fun at building them and
throwing them. It may hurt to see them getting broken or hanging up in the
trees, but thats life, and just another reason to build one :-)
Soft winds...