| / t r i c k e r y / |
|
Time to talk about some of the things that designers do, sometimes inadvertently, that make some locks more difficult and others easier to pick.
1) The most frustrating item has to do with the key wards. Key wards are the guides that stabilize the key as it enters the cylinder. On some locks the wards are very close to the pins obstructing the use of a conventional pick. Sometimes there is no way around this. Other times the use of a filed down hook pick usually solves the problem. You must remember that even a paper clip can open a lock. Use whatever you can find that will fit.
2) Sometimes while picking a lock you will find that the order that the pins set isn't really to your advantage. If the second last pin sets high while the last pin must be set real low, and this is the order, then we have a problem. It is sometimes impossible to get over that second last pin, and depending on clearance you may have to abandon the lock altogether. There is one way of approaching this. If you take a piece of #4 or #6 wire ( or a paper clip ) and put a slight curve in the end you may be able to sneak past that pin and when you hit the back wall of the lock apply a little pressure that will continue to bend the wire so that you may reach that last pin. This is really hard to pull off but works.
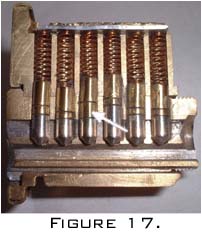
3) Schlage locks (figure 17) implement a rather interesting pin layout designed to thwart lock pickers. Although somewhat effective against juvenile attacks anyone with experience can easily compromise this type.
Note the addition of the wafer between the key and set pins. As mentioned earlier as pins are cleared of the shearline the cylinder will slightly rotate. With the addition of these wafers the lock may appear to be false setting pins high thereby restricting your access to other pins. If you are good with your torque wrench this false setting is easy to overcome. Keep in mind that you wish to lodge only the top pins above the shear line so as you set each pin make sure you don't push too hard. If you apply too much torque you will just lockout each column before the pins have been properly set.
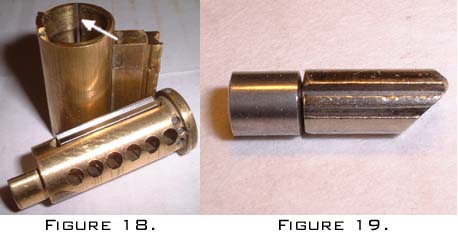
4) The dreaded Medeco(tm). Medeco is a high security lock manufacturer. They're products are very expensive and _very_ secure. Their locks are very common within commercial businesses, restaurants etc. These are by far the hardest locks to pick. Primarily these locks owe their security to precision machining practices, and the clever sidebar they utilize (figure 18). These locks are very tight and smooth with little play. The pins are beveled in all kinds of shapes to impede picking (discussed below). These bevels play a further roll in allowing the key pins to align correctly with the sidebar when the proper key is inserted. Below is the cylinder from a medeco padlock.
I have always known that Medeco locks were tough to pick, but never really understood why. It wasn't until I actually took one apart that quite a few things came to light. The unfortunate part is, this information (depending on your skill) only marginally increases your chances of picking it. They are hard, period.
Looking at figure18 above, we can see some notable differences between the Medeco (tm) cylinder and a typical cylinder. Most notably is the addition of a spring loaded sidebar on the key cylinder. This sidebar can either inhibit or allow cylinder movement depending on pin orientation. The key pins (figure 19) have an integral valley which runs from end to end. Take a look at Figure 20 below, paying attention to the last two columns. Those silver protrusions reside in the valley of a properly aligned keypin. If the pins fail to align (all of them, and regardless of the shear line being clear) this bar won't budge and the plug will refuse to rotate.
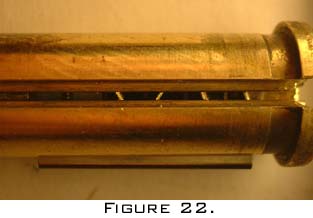
If we remove this bar the Medeco cylinder reacts to picking as can be expected from any other cylinder. The test to the reader here is to be able too identify just when this bar is free. Taking a look at the columns in figure 20 you will notice that their is a cutout (about 20%) into the plug which restricts the key pins to rotate within this constraint. This is not very encouraging as it severley decreases the odds of proper aligment by a foreign object. Furthermore The alignment is not static (figure 22), it varies from lock to lock which unfortunately blows away the idea of creating an alignment jig.
Options?
Theoretically speaking, it may be possible to concentrate your efforts on freeing this sidebar while not over tourqing the plug to a point where pin setting would be impossible. Using your diamond pick with very little torque on the plug employ a side to side in out sweep over the pins. You are not trying to set pins here, as this would impede the rotation of the key pins, you are merely trying to align them with the sidebar. If you can correctly align these pins there will be a slight give in the plug, a very slight give. At this point you have not entirely freed the bar from its notch, which is good because if it travels too far you would cause pins to bottom out on the cylinder body. You have merely depressed it enough to transfer force back on these pins to keep them in line with the side bar. Please note that this is _very_ difficult, but if you get to this point it will be possible to set the pins and open the lock. It may be worth to mention that you must be very careful while scrubbing the pins after they have been aligned. In fact you should probably concentrate on one pin at a time. The scenario that you created by aligning the key pins with the sidebar is very delicate. Any modification in torque, while performing your pin manipulations may cause a greater force against these aligned pins thus disturbing their proper alignment.
I have often wondered if the utilization of a mechanical pick gun with a side to side motion across the pins would help. One would think that this would increase your actual time spent vs. unique attempts. However I am not sure if the pick gun would correctly reset the pins enough to allow them to rotate. Anyone?
I am interested
in any information that people can offer with their experiences with Medeco(tm)
or any locks for that matter. If you have something to offer, please drop
me a line: dp@penix.org.
|
|
|
|
| / a n a t o m y / |
|
The premise of warded locks has existed for centuries. They were one of the first practical lock designs in history. Like most locks their exists many variations of this type however most of them conform to the same basic design.
Although
at first glance warded padlocks appear similar to the pin tumbler padlocks
that we have discussed thus far. Internally however, they are quite
different.
Let's take a look..
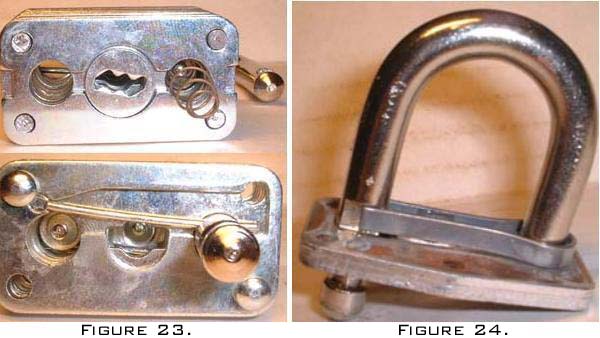
Warded padlocks rely on a very simple design. The main body of the lock contains voids that harbor simple levers that rest on the bolt. The bolt has been machined with grooves in it to accept these levers. At rest these levers reside in their respective grooves thus restricting the movement of the bolt while maintaining the locks closed state. There are two types of levers available for warded locks. Examining figure 23 and 24 you can see that one is a single action and the other dual.
Operation of this lock is simple (figure 25). When the key is inserted and turned this effectively lifts these levers from their grooves and the lock opens. You can also see from this diagram that the bolt is mushroomed at the end and tapered on the upper of the grooves so that it may pass back through the levers without hindrance when the key is removed.
The simplistic design of the locking mechanism in warded locks make them an excellent choice for the outdoors where a little bit of water and the subsequent rust won't hurt their "far from precision" moving parts. These locks are unfortunately stricken with security flaws. The most apparent of which is the amount of levers that secure the bolt. Their is usually one single action an one dual lever and from what I have seen this appears to be the norm for almost all warded locks. In some cases their will just be the upper dual lever securing the bolt.
So how do we pick these locks?
Warded padlocks aren't really picked per se. Although it would be possible to use a couple of pieces of "L" shaped rolled steel to fiddle around with the levers until you perpendicularly depressed all levers present, it would be much easier to use a key blank such as the ones in figure 27.
The second from right blank on that key ring (figure 27) will open most of the warded padlocks that you may encounter. If this is not the case, insert your blank (second or third from left) into the lock ~1/8 " and gently turn it clockwise checking for any resistance. If none is felt procede further into the keyway (1/8" steps) taking note at which levels resistance is felt. Once you have established the number of levers present and at which depth they occur, it is a simple matter of stacking blanks to mimic the positions.
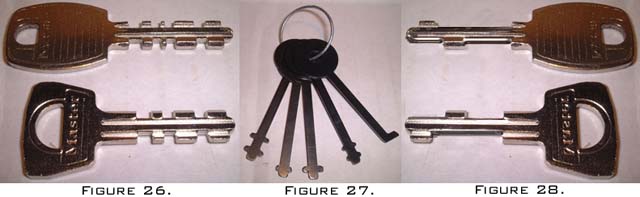
One of the security features present on warded locks is the association between the plate that comprises the keyway and the key itself. The keys for these locks are not flat. They are slightly "Z" shaped and vary in thickness, width, and length. The arrangment of the stubs on these keys also vary in width and positioning.
This system
is a poor one. If we look at figure 28, those keys will still open their
respective locks, even though i removed all but two of the stubs. If I further
removed some material from the key on top and made it flat so that it may
enter the key way of the other lock, it will open both locks and probably
most warded locks available.
| / a n a t o m y / |
|
I am just getting into this area so I will post some information as it arises. From what I can ascertain as of yet is that they are a real pain to pick. Requiring the person to pick the lock more than once (5 times) comes to mind just to open it. They also must be picked to be closed.
There are picks on the market that can make this process quite simple, unfortunately they have a hefty price tag. So, until I get some time to analyze this type of lock a little further, this section will remain quite short.
What I
do know is that they make tubular drills that remove the pins from the cylinders
in these babies. Sounds like a more direct approach to me.
|
|
/ m
o r a l o f t h i s s t o r y /
|
My purpose for the effort expended on this web page was for two reasons really. For starters picking locks happens to relax me and I wanted to test out my new digital camera. Secondly I wanted to dispel any thoughts that some of you might have that a typical lock is actually secure.
Am I wrong to disclose information such as this? Let's consider for a moment the IQ of a typical criminal that would break into your house. It is probably far lower than 50 (I have no statistical information to support this but I assume it is close). Now, do you think they are going to be picking the dead bolt on your front door? The odds are probably 1 in 10,000. Assuming the low IQ of this individual he/she is probably illiterate and would never have the means to assimilate this type of information nor the brain capacity to comprehend it if they came across it. They may however, if walking erect and possessing some basic motor skills notice your bay window and throw a brick through it. Or, if their cognitive skills were slightly more advanced they may make use of a simple lever like a pry bar and test the tensile strength of your front door.
In their simplest form a lock is merely a deterrent. Analogous to the "Do Not Enter" signs that we see so regularly. If you think for one minute that a lock is protecting your privacy or your valuables you are sadly mistaken. Like that sign they are merely a simple visual aid that relay's a message, only with a little more gusto. If you take a walk around your home, or your car, or that little cedar chest that you use in lieu of a safety deposit box at a bank you will likely notice that with a little creative thinking their are numerous ways to bypass the locking mechanisms that you rely on.
That said,
know the value of that which you are trying to protect and act accordingly.
Consider some of the following:
Disassembly and reconstruction courtesy
of a table vise, hacksaw, hammer, countersink, bastard file, 100grit sandpaper
and some krazy glue(tm)
All images for this
page were taken by me with a Fuji film FinePix 40i digital camera
in macro mode. Modifications performed with:
Copyright
©2000-2001 [ -dp- ]
If you
have any question or comments
concerning
this page feel free to contact me.
dp@penix.org