ScopeCheapLPC is designed to pretend to be a slow LPC host so you can
talk to LPC interface devices directly from your PC Printer port. This
means you will be able to program LPC flashes, for example. OverviewThe LPC peripherals are given a clock from the LPC host. It
is specificed to run at 33MHz, but actually the peripherals do not really
care if it is any speed lower than this. So we can fake up an LPC
interface from the printer port under software control, running as fast
as we can reliably make it go (~200kHz). It will be slow though... each LPC bus cycle is 17 clocks, each
of which have to be painstakingly issued under software control. When
used to program flash, it can require more than six LPC bus cycles per byte,
or 102 clocks. It has now been tested and in read mode, it can read back 256KByte
in 21 seconds, or 12KBytes/sec. Programming speed is just less than
1KByte/Sec, or around 5 minutes to program 256KByte. Slow but perfectly
acceptable for low volumes. Still, the CheapLPC costs almost nothing and the alternative is
an expensive programmer, also it is not often the flash will need to be reprogrammed. To be clear for some people who have been confused by this description,
CheapLPC does not directly interface to your X-Box except to get power. It
does not somehow take control of the X-Box LPC bus, there is only one master
on that thing and that is the X-Box. Instead CheapLPC is able to pretend
to be an LPC bus master, and so program LPC flash ICs which may then be removed
from CheapLPC and used with the X-Box LPC Connector. Principles
Implementation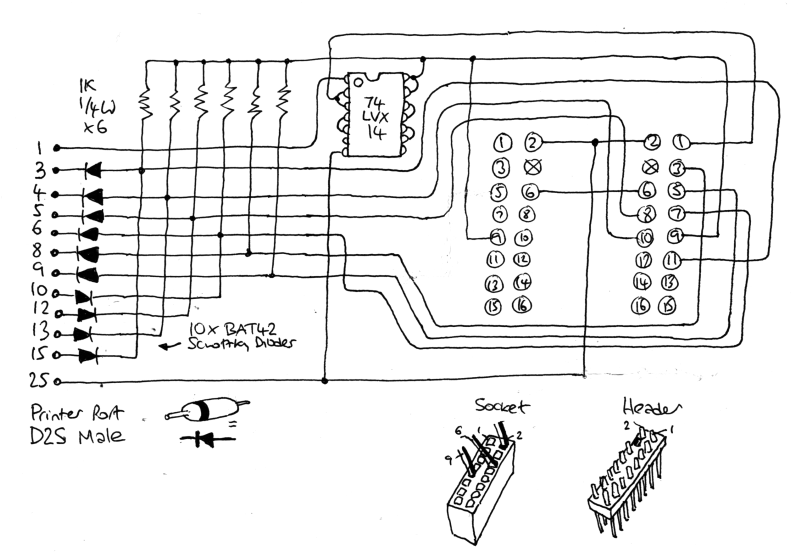
Any Schottky diode will do, it does not have to be BAT42. It is also possible to replace the hard-to-find 74LVX14 with a much more common 74HC14, which is available in DIL packaging that is much easier to handle. In keeping with the 'Cheap' part of the name, this can be hacked up quickly on the connector with no PCB required. The only difficult part is the 74LVX14, which is only available in SO-14 surface-mount package style. However, we are only using four pins of it, three of those are corner pins and the rest are shorted to next door neighbours or left open. 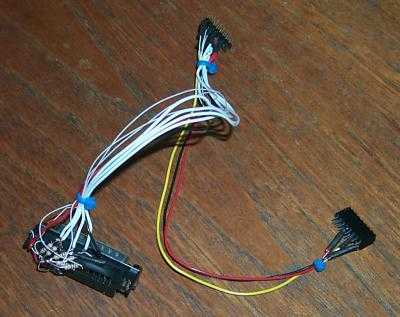
The software uses the milk app, with the -c flag CheapLPC has now been tested with the SST49LF020A, and the SST49LF020 by myself and Integra from XBOXHACKER (and several more people now have it working). Make sure you are running version 0.10 or later of milk. Please note that only the non-A version OF THE 020 ONLY - not the 040 - is of any use in an X-Box. Optional LEDsYou can add two LEDs to show when the CheapLPC is reading or writing. You need version 0.12 of milk or later to get these working.Reading LEDHook the Cathode of the LED to the Printer port connector pin 2. The Anode lead of the LED goes to 3.3V via a 220R or thereabouts resistor.Writing LEDHook the Cathode of the LED to the Printer port connector pin 7. The Anode lead of the LED goes to 3.3V via a 220R or thereabouts resistor.Help on testing your buildIf you run lmilk or wmilk with the -c -T switches, this will enter an interactive test mode that will help you track down bugs. To start with milk samples the four LAD lines on the LPC bus repeatedly and prints what it finds. With the CheapLPC powered and nothing else going on, it should be reporting 1111 all the time. If you short pin 3, 4, 5 and 6 to 0V, you should see the corresponding LAD line reported go low.Pressing enter swaps to write test mode (you may have to press Enter twice in the linux version). Now milks slowly goes through the patter 0001, 0010, 0100, 1000 repeatedly, moving on once per second. You should be able to see with a voltmeter that each of the LAD lines is going high in turn. Some more details about why only the SST49LF020 chip is usableI have been asked numerous times to explain why this is, and why Bonkotech 1.5 bit EEPROMs can't be used instead, etc.. Here is some more details from a post I made on XBOXHACKER:
Where to get the SST49LF020Hundreds of people have emailed me asking to know the Great Secret I am keeping from the world, where they can order SST49LF020s. Several people grumpily insisted to know where they can locally order it, as if I have any idea where they physically are or what kinds of place stock it.I ordered mine through my local distributor as listed at http://www.ssti.com via their ''where to buy'' menu item. You might also like to contact MrChips from XBOXHACKER, who at the time of writing has ordered a bunch and is selling them on at a very reasonable price. See this thread at XBOXHACKER. Inamx's Hybrid Printer Port / Usb CheapLPC2002-08-09 Here is a design mod that was sent in by inamx, who has tested it on stripboard. He had the smart idea of using the USB connector, which makes 5V available permanently (this was news to me: in fact I wrongly told him he was out of luck when he suggested it; I wrongly understood you had to negotiate continuation of power), as a power source and using a regulator to provide the 3.3V that is needed. So you do not need any connection to your X-Box with this design, it is more like a standalone LPC flash programmer. Its still pretty cheap, say, $4 or less if you have salvageable bits.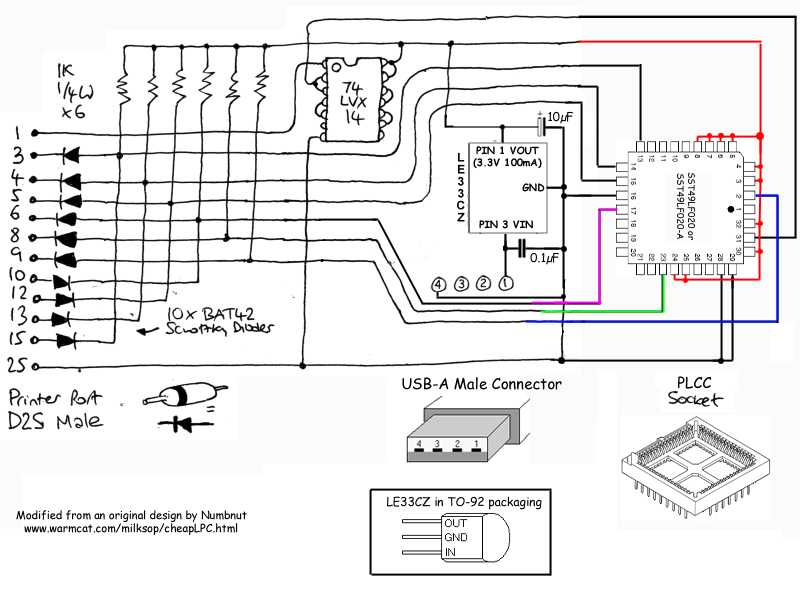
My main tip here is to build the regulator/usb bit first, get that straight - and measure the output so you know you can trust it - before offering its power to anything else. Also note that the pinout of the PLCC socket is a strange thing indeed, you will need to use a multimeter on continuity mode to ensure you have the right pin. The main part of each row pair is ovbious enough, but the corner pins need careful attention. 2002-08-14 Inamx has further issued a stripboard version of his circuit:. Note that the rectangle in the top right is the 74LVX14, it does have 14 pins, he is showing the links between the pins (which look like pins but are connections between two adjacent pins). 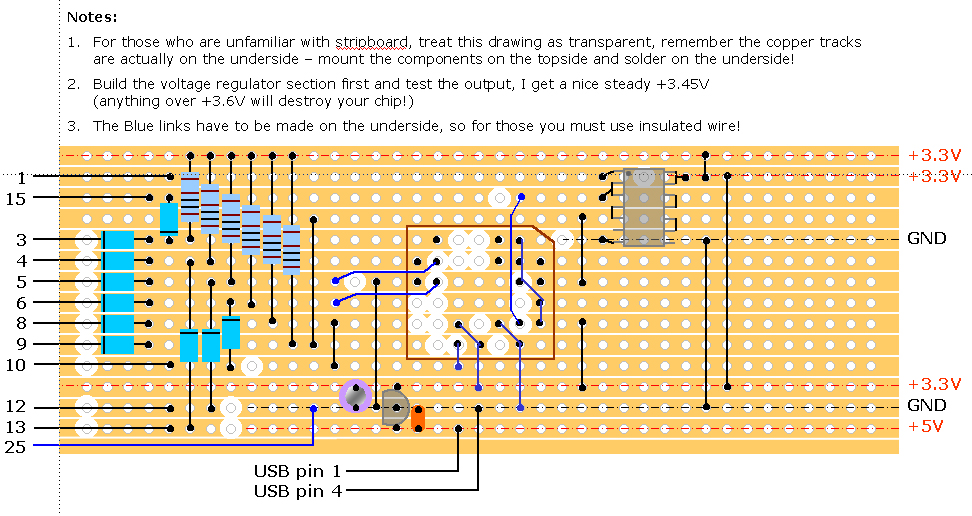
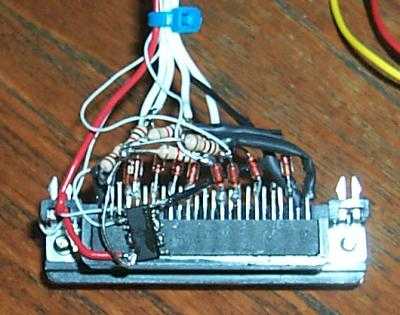
Here is a picture of his design partially built (he did not have a USB connector at this time) 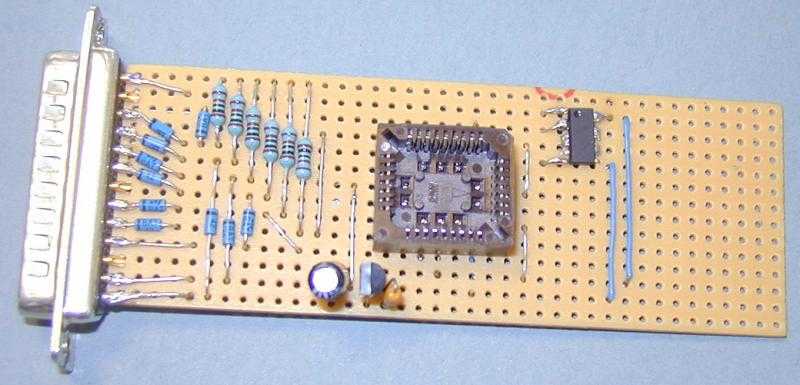
Integra's note on using batteriesIntegra found that using a 3V coin cell was not a reliable proposition. I believe this would be due to the current needed by the flash during program/erase. I suggested on XBOXHACKER that two AA batteries will work, but this has not been tried yet. If you are interested to try it, use FRESH batteries, perfereably Duracell, and hook them [- +][- +]. The - end goes to the 0V net (eg, pin 25 of the D connector) and the + end goes to the 3.3V net (eg, pin 14 of the 74LVX14).Someone else on Xboxhacker subsequently reported this did work fine for them. Viperman's PCBViperman from Xboxhacker has put together a PCB from this design, I have not tested it, but he says it works fine: PDF of CheapLPC PCB Gerber of CheapLPC PCB Green Giant's building serviceGreen Giant off XBOXHACKER enjoys stripboard so much he is offering to build CheapLPCs at more or less cost price, see his page which has pics of a completed one:http://nicolas.cx/greengiant/cheaplpc/default.asp Reported ProblemsThe majority of people who built CheapLPC seem to be working fine. There have been two classes of problem reported with it by a small number of people, which are not understood yet:1) Some PCs just will not work with the device, trying a different PC reveals normal operation. I am wondering if these PCs need the four return lines (pins 10, 12, 13, 15 on the 25-way D connector) to be pulled up harder to 5V. It might be worth trying to add 4 x 1K resistors to 5V at these pins. 2) There has been reports also on some XP machines that NTIOSUPP.DLL is not successfully giving access to the IO. This has to be run as admin the first time so it can install a driver, its not clear what's going on here yet (CheapLPC was originally tested on an XP machine here successfully). |
|||||||||||