Back to Latest News Cheapi2cNotes -1) I am indebted to Milosch Meriac (www.meriac.de) for the code allowing the usermode app to fully take over the CPU for the duration. You can find this code in CMiloschUserRealtime.h in the milk sources. Its obviously fantasically useful for some kinds of hacks, and very smart and selfcontained code too. 2) This code only runs on Linux at the moment. ScopeCheapi2c uses your PC CPU and printer port to perform realtime snooping of a standard 100kHz I2C bus with 100% capture. OverviewCheapi2c intensively
scans activity on two printer port input lines and interprets changes on
these lines according to the I2C protocol, all in realtime. When capture
is completed, the timestamped activity is dumped to stdio. Principles
Implementation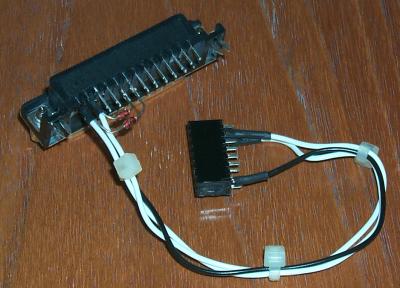
You need a 25-pin male D-connector, preferably with solder bucket termination (these are little cups that make it easy to solder wires to the connector). I only had a rightangle one lying around the office, of course that worked fine. You can find these lying around on scrap ISA printer port expansion cards. Here is a little reminder of which pins are which on a 25-pin male D-connector: 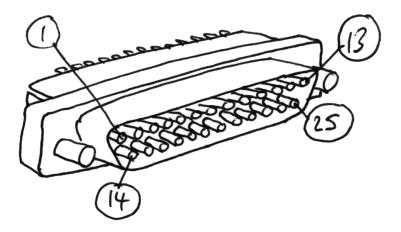 This
is the schematic, note that the diodes are not required, but if used they
must be BAT42 or equivalent SCHOTTKY diodes. The diodes are required
only to allow the PC to write on to the I2C bus, the software for this function
is not written yet. The pin numbers on the right refer to the XBox
LPC connector.
This
is the schematic, note that the diodes are not required, but if used they
must be BAT42 or equivalent SCHOTTKY diodes. The diodes are required
only to allow the PC to write on to the I2C bus, the software for this function
is not written yet. The pin numbers on the right refer to the XBox
LPC connector.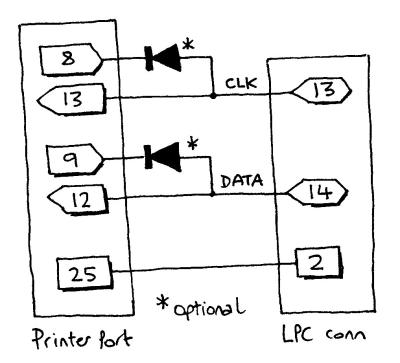 Here are the pin numbers of the XBox LPC connector in full. 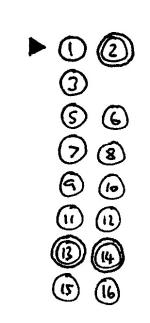
Here is a closeup of the wiring seen from the front: 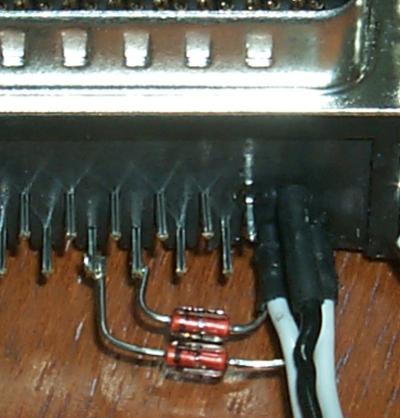
... and from the rear: 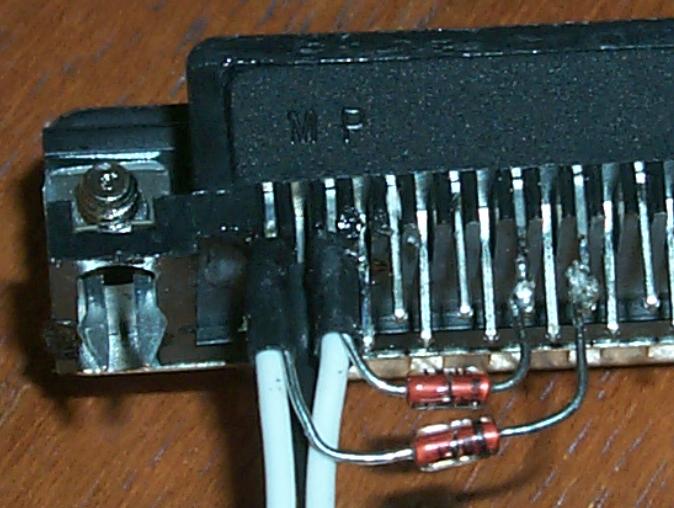
SoftwareYou just use lmilk like this lmilk -2 The -2 switch puts lmilk in i2c mode. Milksop GPL Reflasher - 0.11 - (c)2002 andy@warmcat.com Note that after the Entering capture mode... line, your PC will
seem to be completely frozen, even the mouse pointer will not move. Activate
the device with the I2C sequence you want to monitor, when it is done press
any key on the keyboard to get the dump. The dump can easily be redirected
to a file using something like lmilk -2 >temp.txt The first field in the dump is the time elapsed since the start
of the previous line to the start of this line. Next is the I2C address
the access was associated with (note this is a 7-bit address), then r or
W showing if it was a read or write. Then comes the bytes of data that
were read or written. |
||||||||||